3S Cloud Documentation
  • Go to 3sfarm.com
  • 3S Cloud Render Farm
    • Get started
      • Tutorial Video & Quick Start
      • Screen Descriptions
        • Dashboard Screen
        • File Manager
        • Render Manager
        • Job Details
    • Tutorial
      • Register & Login
      • Upload projects
      • Launch Render
      • Advanced Setting
      • Detect & upload missing assets
      • Get & Check Event Logs
      • Pause, resume & restart render jobs
      • Download render outputs
    • Transfer data
      • Auto-Sync Output with 3S Cloud Desktop
      • Google Drive & Dropbox Sync
    • Payment & Billing
      • Payment & Billing
      • Budget Management
    • Tips
      • Tips for Blender
        • Simulate local path, Upload Blender projects
        • Combine a sequence of videos (.avi, .mkv, .exr) into one in Blender
        • Upload projects using Botaniq Addon
        • Pack a Blender file before uploading
        • How to bake data with FLIP Fluids in Blender
        • How to add one Blender file into another – Append in Blender
        • Make relative paths for cache folder in Blender
        • Import and Make Relative Path for Alembic (.abc) files in Blender 2.90
        • Make Relative Path for FLIP Fluids Cache
        • Make Relative Path for Mantaflow Cache
      • Tips for 3ds Max
        • Simulate local path, Upload 3ds Max projects
        • Rendering the wrong camera due to locked "View to Render"
        • How to Pack 3ds Max Projects - Use Resource Collector in 3ds Max
        • Global Illumination Cache: Calculate Irradiance Map and Light Cache
      • Tips for Maya
        • Simulate local path, Upload Maya projects
        • Problem with Frame Range in Maya Arnold
        • Maya Xgen – Export Patches to Batch Render
      • Tips for Cinema 4D
        • How to save a Cinema 4D project with assets – Package a C4D scene
        • How to consolidate assets – Collect all external C4D assets
        • Simulate local path, Upload C4D projects
      • Tips for Houdini
        • Simulate local path, Upload Houdini projects
    • FAQ
      • Common issues for Blender
      • Common issues for Autodesk Maya
      • Common issues for 3ds Max
      • Common issues for Houdini
      • Common issues for Cinema 4D
    • Terms & Policies
      • Terms of Service
      • Privacy Policy
      • Non-Disclosure Agreement
      • Storage Policy
      • Refund Policy
      • Delivery Policy
  • 3S Cloud Workstation
    • What is 3S Cloud Workstation?
Powered by GitBook
On this page
  1. 3S Cloud Render Farm
  2. Tips
  3. Tips for Blender

Pack a Blender file before uploading

PreviousUpload projects using Botaniq AddonNextHow to bake data with FLIP Fluids in Blender

Last updated 1 year ago

Our system supports both packed and packed Blender files; however, we recommend packing your Blender files before uploading in order to upload your project as a single file without missing assets.

For packed files

Blender has the ability to encapsulate (incorporate) various kinds of data within the blend file that is normally saved outside of the blend file. For example, an image texture that is an external image file can be put “inside” the blend file. This allows sharing a full project as a single file, instead of e.g. an archive containing the blend file and all its dependencies:

Before uploading, please pack your Blender files with the following steps:

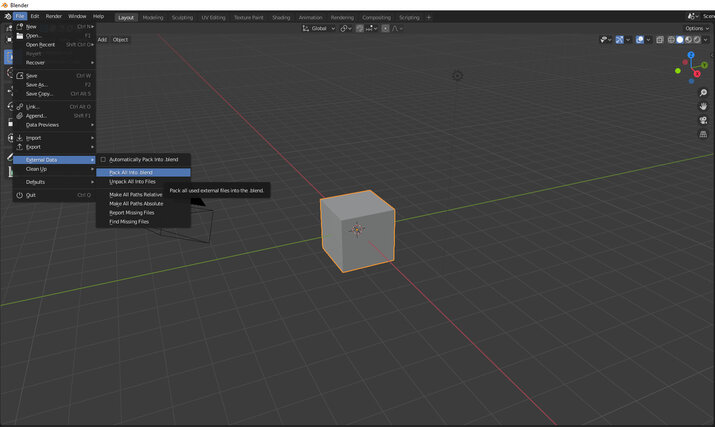
  1. Click "File" -> "External Data" -> "Pack All Into .blend" to pack your assets.
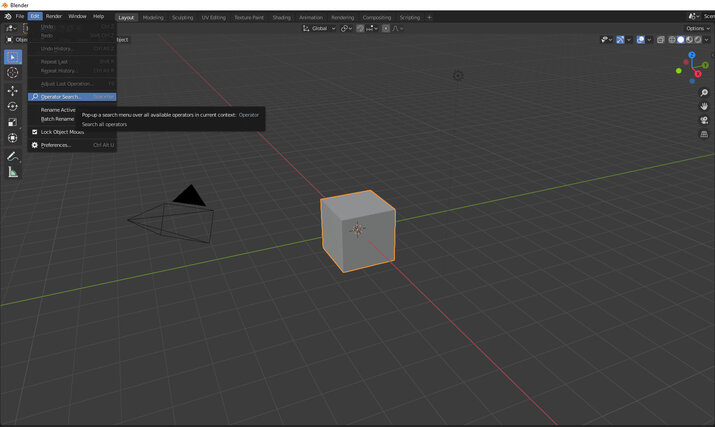
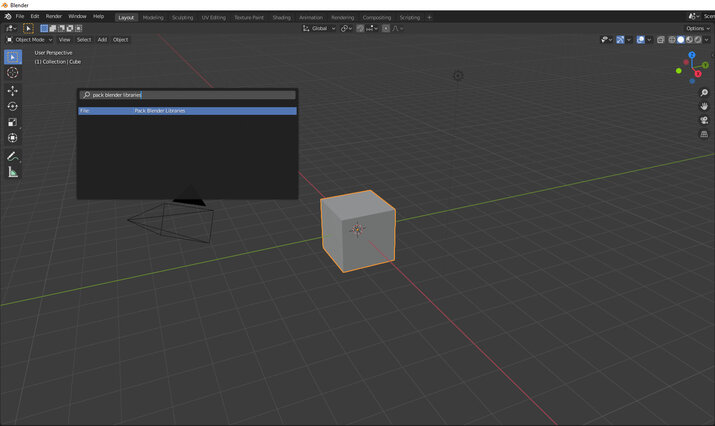
  1. If you use linked libraries, please click "Edit" -> "Operator Search...", then search & click "Pack Blender Libraries" to pack them.

https://youtu.be/QJ9TCCueZoA

Please keep in mind that the textures of all linked libraries need to be packed (Follow the instructions from Step 1).
  1. Please note that:

  • Some textures such as video textures, and image sequence textures cannot be packed into the .blender file. We recommend uploading the Zip file or the folder containing the unpacked .blend file with these textures.

  • If any add-on supplied by 3rd parties you use doesn't work directly, please contact us in order that our team can assist you with the rendering.

For unpacked files

Please make sure that you use relative paths in your file before uploading unpacked files.

There are some ways to upload such files to our system:

  1. Upload the folder which contains your .blender files together with all its assets including external textures, linked libraries, fonts, video/image sequence textures...

  2. Upload the Zip file:

  • Add to archive the .blend file and all the directories containing your data (.blender files, textures, and others) into a Zip file.

  • Upload the Zip file to our system

  • Unzip the file by our Extract Zip File feature into a folder

  • Finally, you can select the folder and launch to render

We are pleased to assist you, so don't hesitate to contact us with any issues.

Pack external data in Blender
Pack Blender libraries
Operator search in Blender